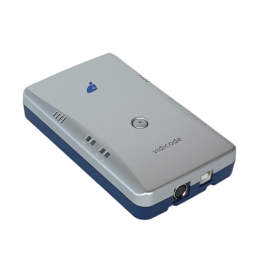
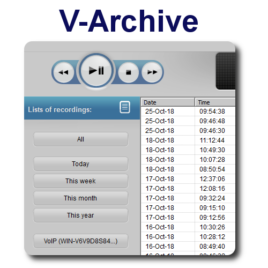
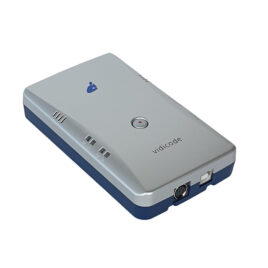
Description
Call recording for softphones and for headsets
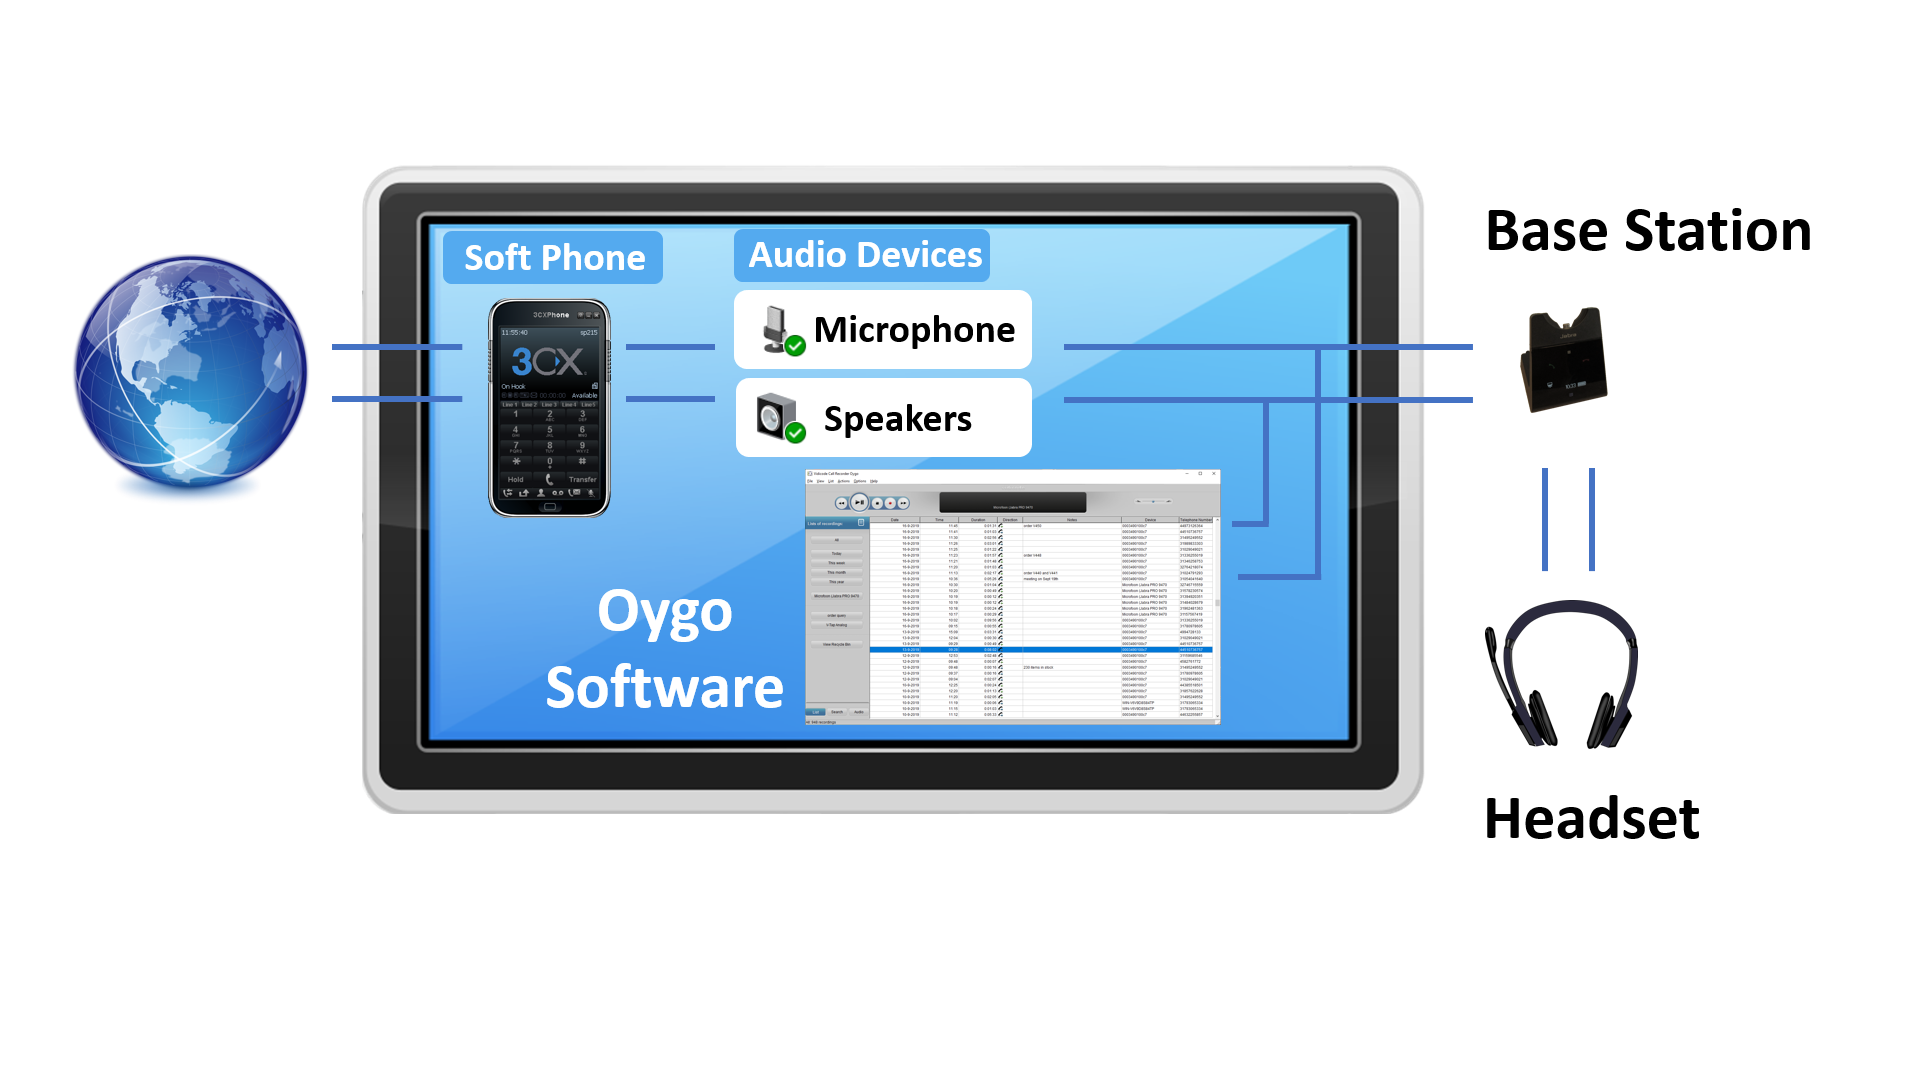
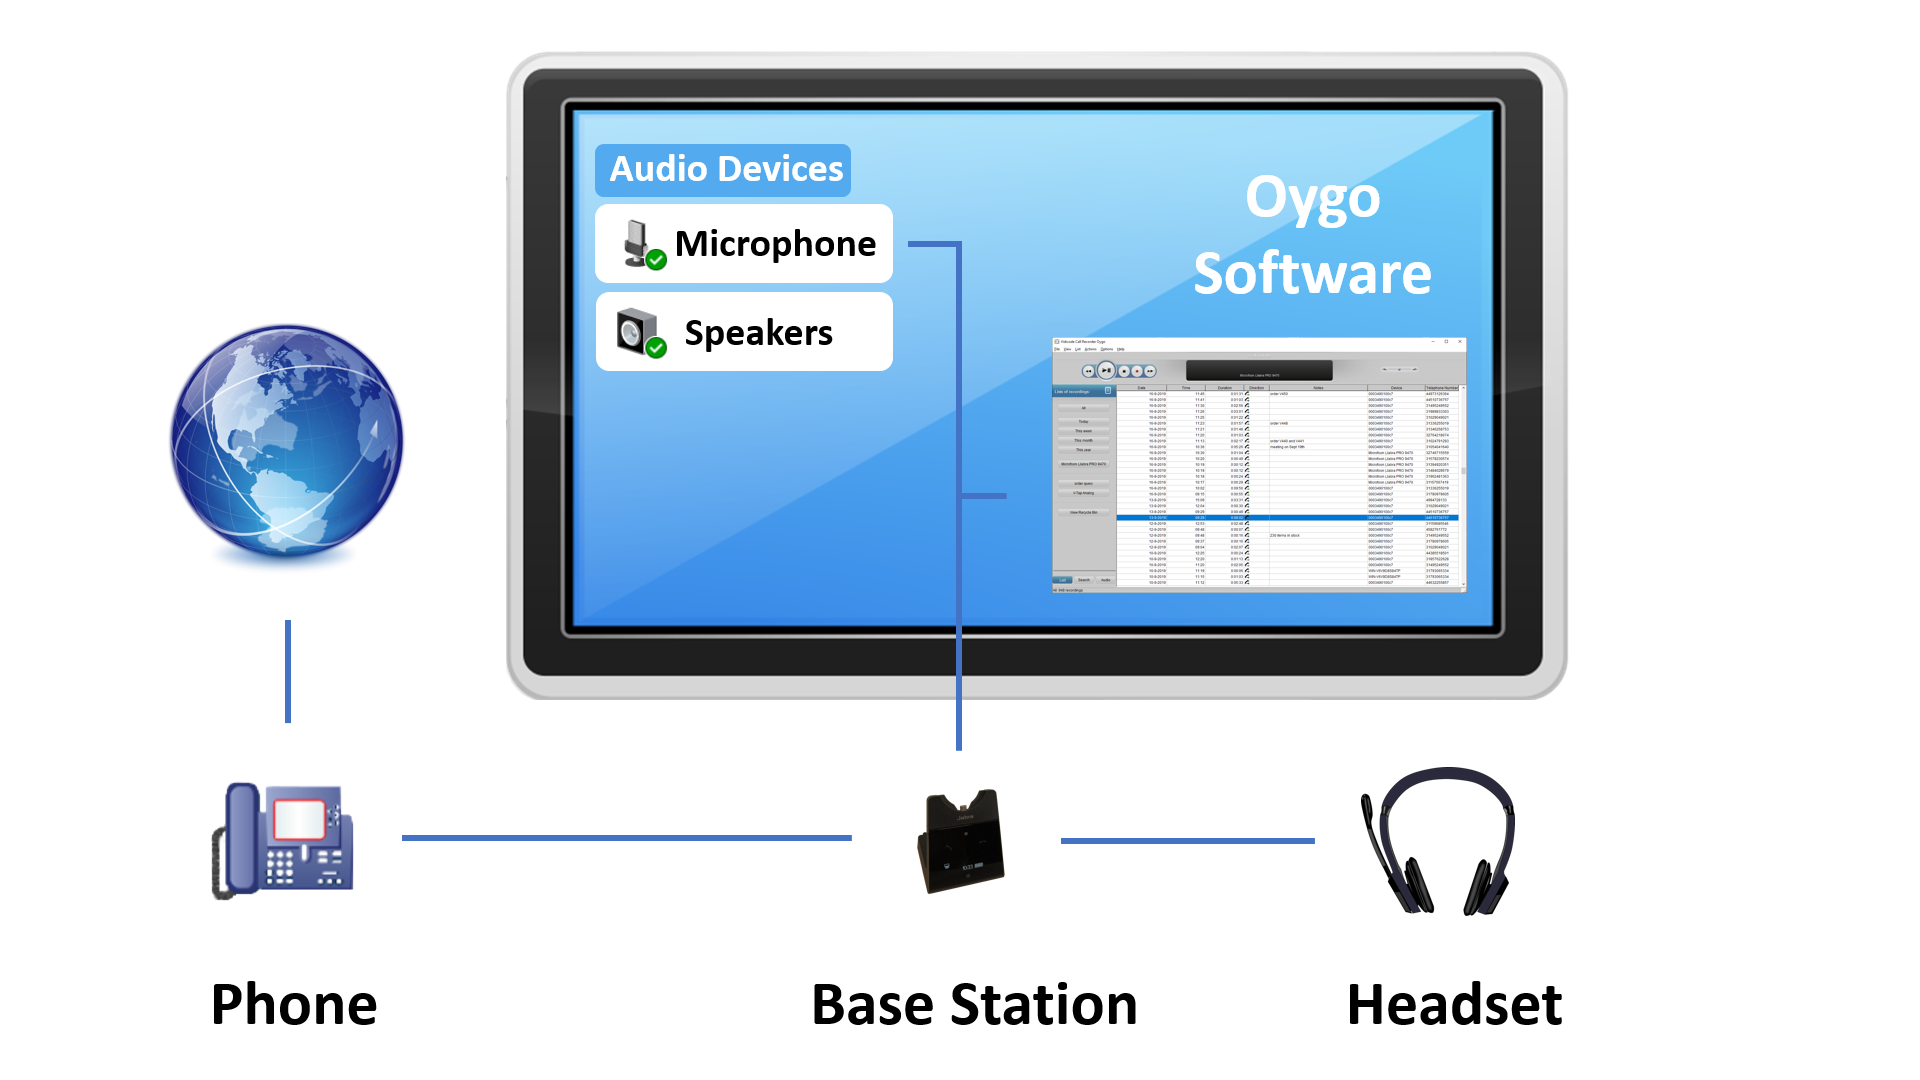
The Oygo records and archives telephone calls that are made using a headset, if the audio is streamed to an audio device on the pc. The Oygo also records from softphones. When using a softphone, Oygo can record both sides. When the Oygo is used with another type of phone, the headset needs to support the recording option to record both sides.
Softphones
The Oygo is able to record calls from softphones. This works for practically any softphone and headset you have.
Other phones
The following headsets are supported if you want to record from other phones:
Jabra:
JABRA PRO 9450
JABRA PRO 9460
JABRA PRO 9460 DUO
JABRA PRO 9465 DUO
JABRA PRO 9470
Jabra Engage 75
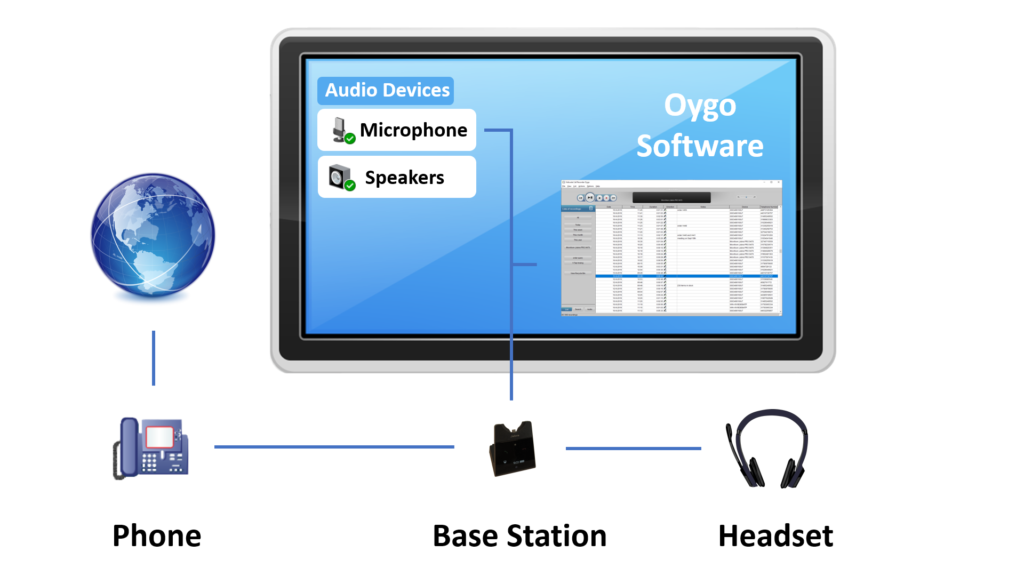
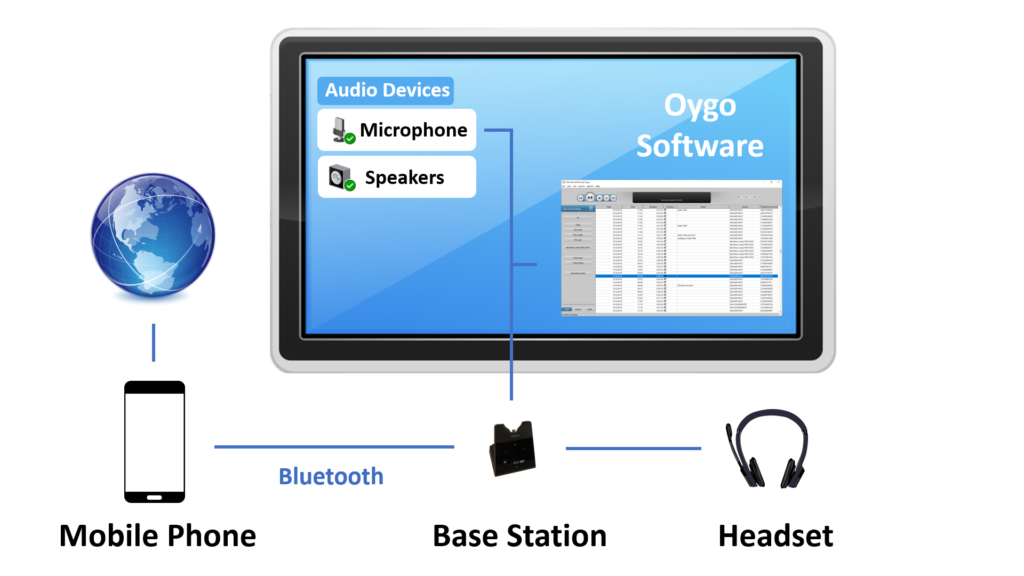
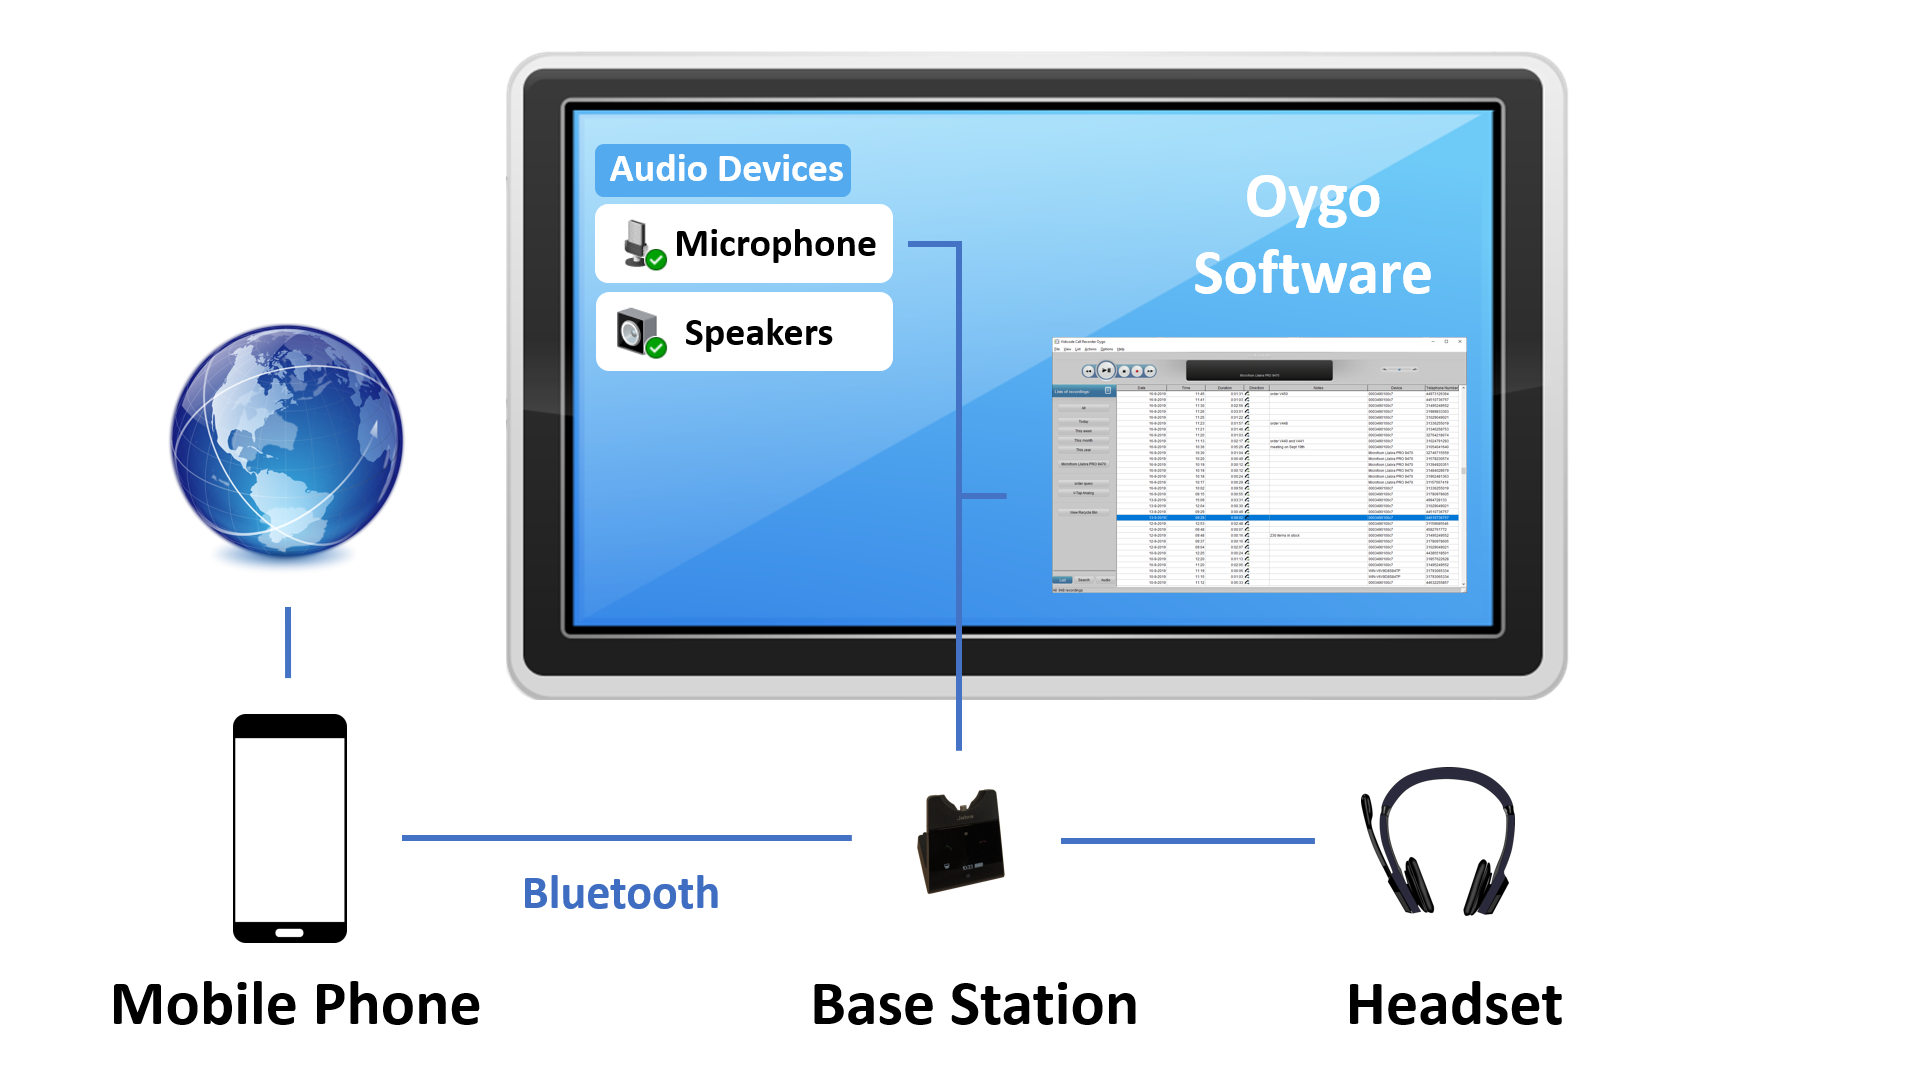
When you use one of these, the Oygo records telephone calls from:
• a desk phone
• a mobile phone with Bluetooth connection
In addition, start and stop detection of telephone calls is available if you use one of these Jabra products. The software starts or stops a recording when you press a button on the headset.
Emotion:
Emotion W880 (IPN Telecom)
When you use Emotion W880, the Oygo records telephone calls from:
• a desk phone
• a mobile phone with Bluetooth connection
Note: Many people keep their headset in active mode continuously. In that case, there is no button pressed at the end of a call. Oygo has other start/stop methods available to choose from.
Start a call or conversation by pressing the button on the device itself and the Oygo starts to record automatically.
Receive a free 14-day license and try the Oygo:
Features
• Automatic recording or recording on demand
• Advanced search on: date, time, duration, notes, name and device
• Import and export of complete archives for backup purposes
• Playback and e-mailing of recordings
• Automatic update of call listing
• Password protection of recordings
• User specified display of call listing
• Notes field and Names field
• Telephone number detection (only for Skype for Business)
Optional Features
• Screen recording with an additional Screen Recording license
• Upload to a central Apresa database (with an upload license)
Specifications
• Works with virtually any headset / Soft-Phone combination.
• Special connectivity for Jabra Engage, Jabra PRO™ series and E-Motion W880 headsets
• Special connectivity for Jabra Speak 750 speakerphone
• Ideal recording solution for Jabra Engage 75 headset
• Stores 180 hours of conversation per GB free disk space on the PC
• Currently supports over 10 languages
• Can be installed on: Windows 7 / Windows 8.x / Windows 10
Oygo Software for Windows
Download the Oygo software and activate it using the key you’ll receive after purchase. You can start recording right away.
Help for Call Recorder Oygo
Go to the Oygo help page.
User Guide
Download: Call Recorder Oygo Manual in English (pdf)
Download: Call Recorder Oygo Software
Configuration for the Jabra Engage 75 headset
Configuration for the Jabra PRO 9470 headset
Configuration for the Emotion 880
Screen Recording (additional license required)
Oygo software for headsets and softphones
The Oygo is an application for systematic recording and archiving of telephone calls that are made using a headset. Oygo can record calls from a headset when the audio of the headset is streamed to an audio device on the PC. Recordings are stored on the hard disk of the computer.
To record calls using the software, the software needs to be activated first.
Database
The program stores recordings in a versatile database. Pre-defined queries for time intervals are readily available. Custom queries can be made and saved. Recordings can be exported from and imported back into the database. The database has its own Windows style Recycle-bin.
Recording
The Call Recorder Oygo application can record from one or more audio sources at the same time. By default, recording is done automated. Manual recording can be enabled for each individual device in the Device settings.
Configuration
To record from an audio source, such as a headset, the audio source must be available on the PC as an audio recording device. If available, the audio source will be listed in the Devices drop-down box on the Devices screen. Not all headsets present their audio as an audio recording device on the PC. Depending on the type of headset, it might be needed to make changes to the configuration on the headset base station, to make the audio source available.
Make sure that the headset base station is connected to the PC, for example using a USB-wire. If there is option in the headset base station to enable recording, enabled this option. It might be needed to enable SoftPhone functionality on the headset base station, to make sure an audio recording source is available on the PC. For details about how to configure your headset, consult the manual of the headset that is used.
Main Screen Layout
The three tabs on the left side let you access most of the functionality of the Call Recorder Oygo. The icon in the tray bar, or a small window, can be used to display the device status.
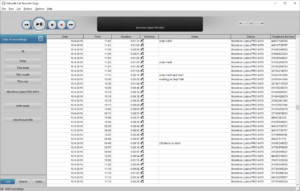
The main screen looks as follows:
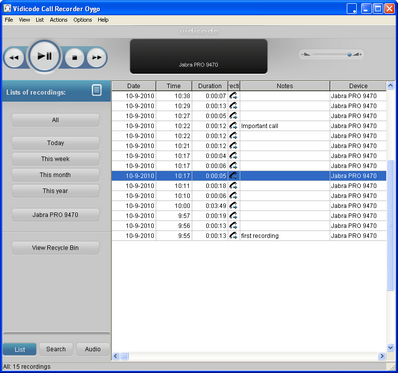
It is divided in three parts:
1. The playback and recording department (at the top)
2. The three tabs: List, Search, and Audio (at the left side)
3. The list of recordings (the large remaining area)
Main Screen: Playback and recording department
The playback and recording display is at the top of the screen. Playback and recorder keys functions are described below.
Normal playback
Double-click on a recording to play it, or right-click on it and select Play.
Playback and recording control display
The recorder key functions resemble the ordinary recorder key functions known from for instance the VCR.

• A: Moves the playback position backward. Keep the key pressed for repeated and increased speed.
• B: Start or pause the playback of the currently selected recording.
• C: Stop the playback or recording.
• D: Start the recording for the currently selected recording device. This button is not visible when recording is automatic. When you have multiple devices connected, you can select another device in the List tab.
• E: Moves the playback position forward. Keep the key pressed for repeated and increased speed.
• F: Information about the current playback or recording is displayed here. Click on the progress bar to move to a specific position in the playback. When no playback is active, the name of the selected recording device is displayed (in this example: CR: 300039).
• G: Controls the playback volume.
Hotkeys
| Key | Function |
| Ctrl + R | Start Recording |
| Ctrl + P or Spacebar | Play / Pause |
| Ctrl + L | Stop |
| Ctrl + U | Backward |
| Ctrl + I | Forward |
| Ctrl+M | Monitoring |
| F6 | Silencing |
Main Screen: List, Search, and Audio
• In the List tab, you can view the recordings that are within a predefined timeframe (today, this week), the Recycle Bin, saved Search Queries, and all recordings by a specific device.
• In the Search tab, you can define a Search Query based on a recording’s date, time of day, name, telephone number, notes, and other properties.
• In the Audio tab, you can put the current recording “On Speaker”.
Main Screen: List of recordings
The list of recordings changes when you do a Search, or view a predefined List. To view a list of the complete database, click the All-button in the List tab.
Oygo Settings
Setup of recording and playback are made in the Options windows.
Oygo Software and Jabra Engage 75 headset
The Call Recorder Oygo software is ideal for the Jabra Engage 75. This is how to configure the Oygo and Jabra Engage if you’re using a deskphone.
Configuring the Jabra Engage 75
Install the Jabra Engage 75. Follow the instructions on the touch screen of the Jabra base to do this. Make sure the Jabra is connected to your pc and your deskphone.
The arrow down button of the Jabra base looks like this:
![]()
Press the arrow down button on the Jabra base for 2 seconds to reach the Advanced Menu. Press + to select Base. Press the ✓ button (check mark) and scroll down with the arrow down button to find the Record call option. Press the – button to select On and press the ✓ button.
Configuring the Call Recorder Oygo
Start the Oygo application on your pc. Go to the Options menu. Choose Devices. Select the device “Microphone (Jabra Engage 75)” from the drop-down list in the top left corner. Check “Enable recording by this device.”
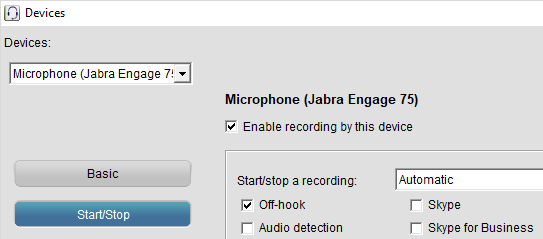
Set Start/stop a recording to Automatic. Check Off-hook, but don’t select Audio detection. With these settings, the Oygo will start or stop a recording if you start or stop a telephone call with the Jabra Engage 75.
Call Recorder Oygo Software and Jabra PRO 9470
How to configure the Oygo and Jabra PRO 9470 if you’re using a deskphone.
Configuring the Jabra PRO 9470
- Install the Jabra PRO 9470.
- Make sure the Jabra is connected to your deskphone and your pc.
- Go to the main screen of the base of the Jabra PRO.
- You’ll see a laptop symbol and a deskphone symbol. Click on the deskphone symbol to select “Deskphone”.
- Click on the yellow wrench symbol in the top right corner to go to the SETTINGS menu of the Jabra. Click “Enable recording”. The button text will change to “Disable recording”. Recording is enabled now. This means that your pc, and therefore the Oygo software, will also receive audio from the remote side.
Configuring the Call Recorder Oygo
Start the Oygo application on your pc. Go to the Options menu. Choose Devices. Select the device “Microphone (Jabra PRO 9470)” from the drop-down list in the top left corner. Check “Enable recording by this device.”
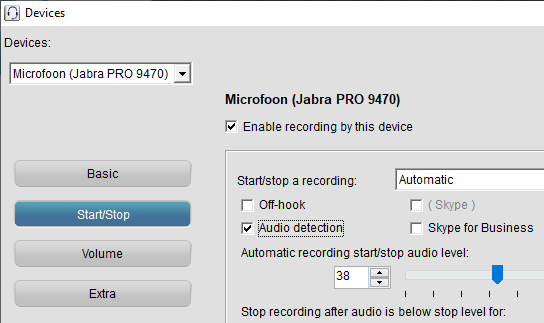
Here you can choose when the Oygo must start and stop a recording. Set up automatic start and stop detection as shown in the picture below.
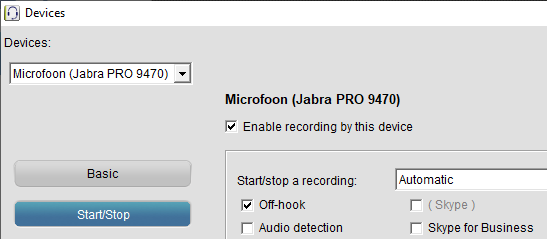
Set Start/stop a recording to Automatic. Check Off-hook, but don’t select Audio detection. With these settings, the Oygo will start or stop a recording if you start or stop a telephone call with the Jabra PRO 9470.
The other options are “manual recording” and “audio level detection recording”. They are described below.
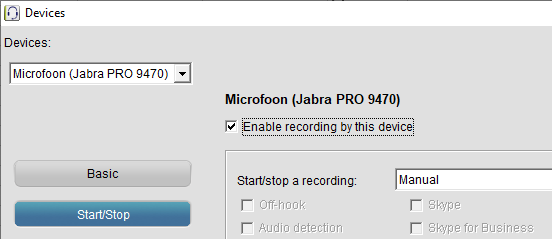
Set Start/stop a recording to Manual, if you want the Oygo to start a recording when you press the record button. Stop the recording with the stop button.

If you want the Oygo to start recording when the audio reaches a certain volume level, set Start/stop a recording to Automatic and tick the box “Audio detection”.
Oygo for Emotion 880 headset
To enable recording of calls (the local and remote side), follow the following procedure, but only if you don’t use a softphone:
On the Emotion 880, press and hold the PC button for at least 2 seconds.
As a result, both the Phone and PC LED should be on, and then the headset is ready to be recorded. If this does not happen, then you will need to update the firmware of your Emotion headset.
Oygo for Softphones
This is how to configure the Call Recorder Oygo for softphones. We’ll use the Plantronics Savi W440-M as an example.
Installing the headset
Make sure your headset is connected to the pc. The Savi W440-M consists of the D100-M and the WH500 headset. In Windows, Plantronics D100-M is the device that shows up.
Configuring the Call Recorder Oygo
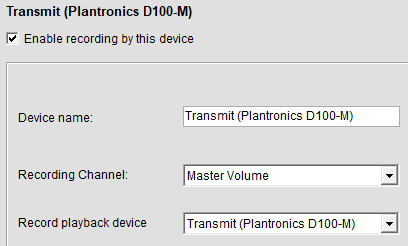
Start the Oygo application on your pc. Go to the Options menu. Choose Devices. Select the device “Transmit (Plantronics D100-M)” from the drop-down list in the top left corner. Check “Enable recording by this device.” See the picture below.

Click on the Basic button to reach the Basic tab of this window (Devices window). Select your headset as the Record playback device. When this is done, the audio of the remote (the person that calls you) will be sent to the Oygo and will be part of the recording. This is needed for a softphone configuration. See the picture below.
Click on the Start/Stop button of this window (Devices window) to reach the Start/Stop tab.
Set Start/stop a recording to Automatic. Check Audio detection. With these settings, the Oygo will start a recording when the volume of the audio is above a certain level.
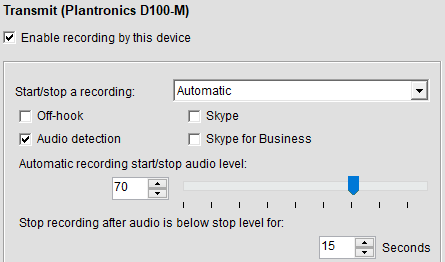
Set Start/stop a recording to Manual if you want to start recordings with the record button of the Oygo, and stop them with the stop button.
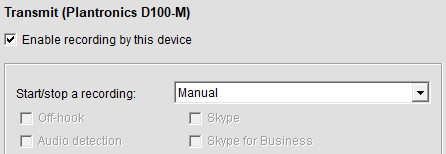
If you enable the Manual recording option, the record button will appear in the console.

Screen Recording (additional license required)
To use the feature Screen Recording, follow these steps:
• Purchase a Screen Recording license
• Open the Oygo Software
• Go to the Options menu and click on Setup
• Click on the License tab and fill in the Screen Recording license key
• Click on the Screen tab and turn on Screen Recording. You can specify which screen(s) of your PC should be recorded.
Diagrams
Recording Softphones with the Oygo
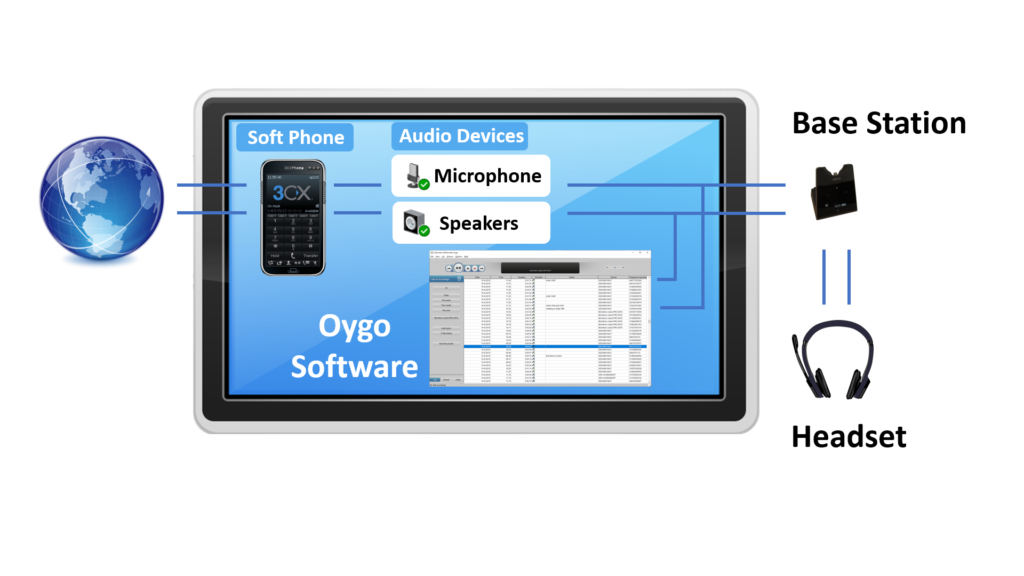
Recording Headsets with the Oygo
